5 Steps to Fix Your iPhone 12 Proximity Sensor Problem DIY
Dealing with your iPhone 12’s proximity sensor can feel like wrestling with a ghost. You might wonder why your screen stays on during calls, or why your face keeps hanging up on people. But don’t worry. You can fix this iPhone 12 proximity sensor problem DIY, and it’s easier than you might think.
Tackling iPhone 12 proximity sensor issues yourself not only saves you from costly repairs, but it also gives you the power to understand and handle your device better. Whether it’s a DIY iPhone 12 sensor repair or simply tweaking sensor settings, you’ll learn how to get that sensor working smoothly again. And you’ll discover why even a screen protector can obstruct a sensor, causing unexpected trouble during calls.
Ready to take control of your device and fix that pesky sensor once and for all? Dive right in, and enjoy a seamless iPhone experience without those annoying interruptions!
Within the story
Identify the Issue
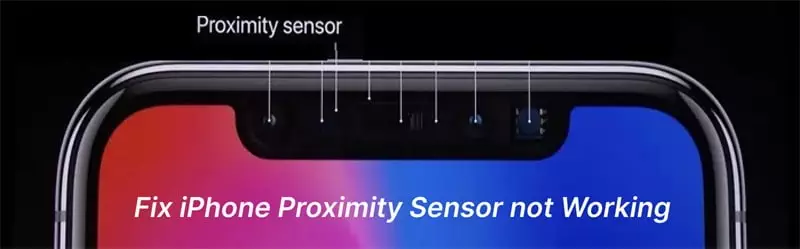
If you’re experiencing iPhone 12 proximity sensor issues, you are not alone. The proximity sensor is an important feature. It helps your phone know when to turn the screen off when you hold it to your ear during calls. But, how do you know if there’s a problem?
Signs of Sensor Malfunction
First, notice if the screen stays on during calls. This is a big clue that there’s an issue with the sensor. Normally, the screen should turn off to prevent unwanted touches. But if it’s still active, it might mean the sensor isn’t working well.
You might also see random screen activations. This happens when the sensor fails to detect when your phone is close to your ear or pocket. It can be annoying as it might lead to accidental touches.
Another sign is when the sensor fails to detect nearby objects. If you notice your screen doesn’t turn off when it should, the sensor might be malfunctioning.
Common Causes
Wondering why these problems happen? There are several reasons. Sometimes, recent software updates can trigger issues. These updates can change settings or introduce bugs affecting the sensor.
Physical damage or debris can also play a part. If your phone has been dropped or is dirty, it might affect how the sensor works. Cleaning it might help solve the problem.
Incorrect sensor settings might also be at fault. If your settings are off, the sensor might not work as it should. Checking and adjusting these can sometimes fix the issue.
Initial Troubleshooting Steps
Now that you’ve identified the problem, it’s time to start some simple iPhone 12 sensor troubleshooting. These steps might seem basic, but they can work wonders if done right.
Restart Your Device
The first step is to restart your iPhone. Turn it off and then back on. This simple action can reset the system and resolve many minor sensor issues. After restarting, check if the sensor issue persists. Sometimes, this is all it takes to get things back in order.
Update to Latest iOS
Another thing you should do is ensure your software is current. Updates often come with fixes for known problems, including sensor issues. Go to settings and check if you need to install the latest iOS update. Keeping your phone’s software updated can prevent many problems.
Clean Sensor Area
Inspect the front-facing area of your phone. Carefully remove any dirt or debris that might obstruct the proximity sensor. Use a soft, dry cloth for this task. Make sure the area is clear so the sensor can work properly.
Check Sensor Settings
Don’t forget to examine your iPhone 12 sensor settings. Go into your settings and ensure everything is as it should be. Sometimes, a simple setting adjustment can resolve sensor issues and get things back on track.
Advanced DIY Fix Techniques
If the initial steps didn’t help, it might be time to try some advanced DIY iPhone 12 sensor repair options. These methods are a bit more involved but can be effective if done correctly.
Software Reset
One option is to perform a software reset. This won’t cause data loss but can resolve many glitches. Make sure to back up your data first. Reset your settings, and see if the sensor glitch resolves. If something goes wrong, you can restore from a backup. Back up important data to avoid losing anything.
Calibrate Proximity Sensor
You can also try to calibrate the iPhone 12 proximity sensor. This can improve its accuracy and functionality. Follow these steps to calibrate: Open the dialer app and type sensor codes provided by Apple. Test the sensor after calibration to ensure its success. Test within safe limits to avoid any mishaps during calibration.
After following these steps, your sensor should work better. If not, you might need to explore other options.
Repair Options
If the DIY methods don’t give satisfactory results, it’s time to consider professional repair options.
Contact Apple Support
Your first point of contact should be Apple Support. Discuss your options with the professionals there. They can offer guidance and solutions that might not be obvious to you.
Visit Authorized Repair Center
If you’re not getting anywhere, visiting an authorized repair center is your best bet. They can diagnose and fix the problem in no time. This option ensures your phone gets expert attention without risk of further damage.
Preventive Measures
Once you’ve resolved your issues, you want to minimize future proximity sensor glitch iPhone 12 incidents. Here are some preventive measures to keep in mind.
Use Protective Cases
Consider using protective cases that don’t cover the sensor. Make sure they fit properly. This can prevent accidental damage while keeping your phone safe from drops and scratches.
Avoid Untrusted Apps
Only download apps from trusted sources. This helps protect your device’s integrity and prevents software issues that could affect the sensor. If you’ve installed any suspicious apps, uninstall suspicious apps immediately.
Taking these steps can help keep your phone’s sensor in good shape in the long run.
When to Consider Hardware Fix
If nothing has worked and the problem persists, a hardware fix might be necessary. Assessing whether this is needed is essential.
Assess Hardware Damage
Look for any visible damage on your phone. This could give you a clue if a hardware fix is needed. If there’s damage, it might be affecting the sensor.
Decide on Professional Help
If you’re not comfortable handling it yourself, choose among repair services. Consider the warranty status of your phone when making this choice. Professional repairs might be covered.
DIY Hardware Repair
If you’re confident with your skills, you can attempt a DIY hardware repair. Use an iPhone 12 repair guide to navigate this process. Proceed with caution and ensure you have the right tools.
Attempting a DIY repair can save you money, but only try this if you’re sure you can manage it.
Remember to take every step with care to prevent further damage to your iPhone 12.
Wrap Up Your DIY Fix
Taking control of your iPhone 12 sensor issues empowers you. With simple steps, you can improve your phone’s functionality and enjoy seamless communication again. This process is not only satisfying but also saves you time and potentially costly repairs.
Start by checking your phone’s settings to ensure everything is aligned correctly. Then, follow each step you’ve learned to address the sensor issue confidently. If needed, practice patience, as some adjustments might take a couple of tries. Remember, you are capable of troubleshooting and solving these problems by yourself.
Now that you’ve got the knowledge, go ahead and apply what you’ve learned. Take action, and fix that pesky sensor today. You’ve got this!